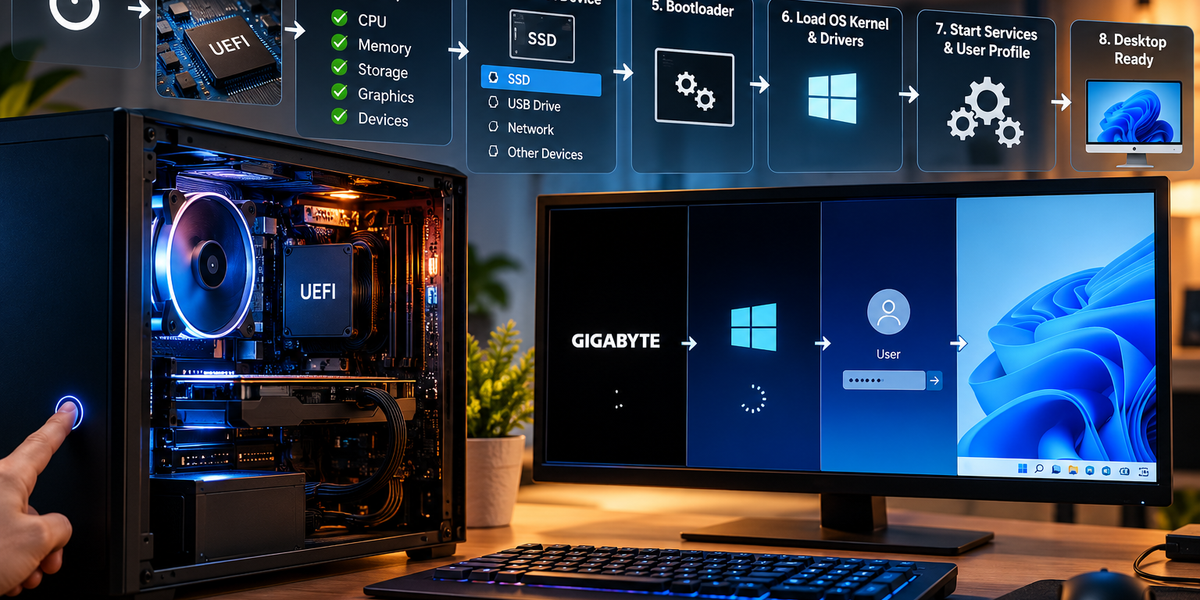
How a Computer Boots Up (Step by Step)
Pressing the power button on a computer feels almost instantaneous. The screen lights up, a logo appears, perhaps a loading animation spins for a few seconds, and eventually you arrive at a login screen or desktop. From the user’s perspective, very little seems to happen.
Inside the computer, however, those few seconds contain an impressive sequence of events. Before you can open a browser, play a game, or access a document, the machine has to wake its hardware, check that essential components are functioning, locate an operating system, load critical software into memory, initialize devices, start background services, and prepare the interface you eventually see.
This entire process is called booting. The word comes from “bootstrap,” based on the old expression of pulling oneself up by one’s bootstraps. The name fits because a computer faces an interesting problem when it starts: software is needed to operate the machine, but the software itself must somehow be loaded before it can run.
The solution is a carefully organized chain in which each stage starts the next.
Step 1: You Press the Power Button
Everything begins when you press the computer’s power button.
It may seem as though the button directly turns on every component, but modern computers use more sophisticated power-management systems. Pressing the button sends a signal that begins the process of supplying and regulating electricity throughout the machine.
On a desktop computer, the power supply converts electricity from the wall into the voltages required by different components. A laptop performs a similar job using electricity from its battery or charger.
The motherboard, processor, memory, storage devices, graphics hardware, and other components begin receiving power. However, receiving electricity does not mean the computer is ready to run applications. At this stage, the machine still needs instructions telling it what to do next.
Those first instructions come from firmware.
Step 2: The Firmware Takes Control
Before Windows, macOS, Linux, or another operating system can run, the computer needs a smaller and more fundamental piece of software capable of starting the machine.
Modern computers commonly use firmware called UEFI, which stands for Unified Extensible Firmware Interface. Older computers traditionally used a system called BIOS, or Basic Input/Output System. People still sometimes use the term BIOS casually even when discussing computers that technically use UEFI.
The firmware is stored on the motherboard rather than on the computer’s normal operating-system drive. This is important because the computer needs something it can execute before it has located or loaded the operating system.
Once the processor begins executing the firmware instructions, the startup process can move forward.
Step 3: The Computer Checks Its Hardware
The computer cannot safely continue if essential hardware is missing or malfunctioning, so one of the early startup stages involves checking and initializing important components.
This process is traditionally associated with the Power-On Self-Test, commonly called POST.
The system checks whether critical hardware is available and functioning sufficiently for startup. It may initialize the processor, identify installed memory, detect storage devices, prepare graphics hardware, and examine other essential components.
The exact process varies considerably between computers and manufacturers, but the purpose is broadly the same: determine whether the machine has what it needs to continue booting.
If something goes seriously wrong at this stage, the computer may never reach the operating system.
Step 4: Problems Can Appear Before the Screen Does
Early hardware failures can be particularly confusing because the operating system has not started yet. Windows cannot display an error message if Windows itself has not been loaded.
Motherboards therefore have other ways of communicating startup problems. Some computers produce sequences of beeps, while others use diagnostic LEDs, small displays, or blinking power indicators.
Different patterns can correspond to problems involving memory, graphics hardware, the processor, or other components.
This explains why a computer that powers on but shows a completely black screen does not necessarily have a broken monitor. The machine may be failing during an earlier stage of the boot process.
Technicians can often use these diagnostic signals to determine which component is preventing startup.
Step 5: UEFI Identifies the Available Devices
Once the basic hardware is functioning, the firmware begins identifying devices connected to the system.
The computer needs to know how much memory is installed, which storage drives are available, what hardware is connected, and which devices might contain something capable of booting.
This is one reason you may briefly see information about memory or storage when starting certain computers.
Most modern machines hide much of this process behind a manufacturer’s logo, creating a cleaner startup experience. Behind that logo, however, the firmware is still performing important initialization work.
Eventually, the computer reaches a crucial question: where is the operating system?
Step 6: The Computer Looks for Something to Boot
A computer can potentially start an operating system from several types of storage.
Most everyday computers boot from an internal SSD or other storage device. However, computers can also be configured to boot from USB drives, external storage, network locations, or other sources.
The firmware maintains information about the preferred boot order or boot entries.
For example, the system might normally attempt to boot from its internal SSD first. If no valid operating system is found there, it might check another device.
This capability is useful when installing a new operating system or performing repairs. A technician can place recovery or installation software on a USB drive and instruct the computer to boot from that device instead of its normal internal storage.
Step 7: The Bootloader Takes Over
Finding the storage device is only part of the problem. The computer still needs a way to begin loading the operating system.
This is where a bootloader becomes important.
A bootloader is a relatively small program responsible for starting the operating system. The firmware identifies the appropriate boot entry and transfers control to the relevant bootloader.
At this point, the startup process begins transitioning away from the motherboard’s firmware and toward the operating system installed on the computer.
The bootloader knows enough about the operating system to locate the critical components needed for the next stage.
Different operating systems use different boot mechanisms, but the general idea remains similar: firmware starts the bootloader, and the bootloader starts the operating system.
Step 8: The Operating System Kernel Is Loaded Into Memory
At the center of an operating system is a critical component called the kernel.
The kernel manages some of the most fundamental interactions between software and hardware. It coordinates processor time, manages memory, handles devices, supports storage access, and provides essential services that other software depends on.
The bootloader loads the kernel and other necessary startup components from storage into RAM.
This distinction between storage and memory is important.
The operating system is permanently stored on an SSD or another storage device, but processors cannot simply treat all long-term storage as working memory. During startup, essential operating-system code and data are loaded into RAM, where the processor can access them efficiently.
Once the kernel is ready, it begins taking control of the computer.
Step 9: The Operating System Starts Understanding the Hardware
The firmware performed enough hardware initialization to get the computer started, but the operating system needs much more detailed control over the machine.
This is where device drivers become important.
Drivers are specialized pieces of software that allow the operating system to communicate with particular hardware components. There may be drivers for graphics hardware, network adapters, storage controllers, audio devices, keyboards, touchpads, printers, and many other components.
As the operating system boots, it loads the drivers required to use the computer’s hardware properly.
Without the correct driver, a component may not work at all or may function only with limited capabilities.
This is why driver problems can sometimes cause strange behavior after an operating-system update or hardware change.
Step 10: Storage Systems Become Available
The operating system also needs access to the files stored on the computer.
Storage devices organize information using file systems. Windows commonly uses NTFS for its main system storage, while macOS commonly uses APFS. Linux systems can use several file systems, with ext4 being one familiar example.
During startup, the operating system makes the necessary file systems available so it can access programs, settings, user accounts, documents, and other stored information.
At this stage, the machine is moving rapidly from a minimal startup environment toward the full computing environment you recognize.
Thousands of files may be accessed during the boot process without you ever seeing them.
Step 11: System Services Begin Running
An operating system consists of much more than the desktop interface you see.
Many programs and processes operate quietly in the background. These are often called services or daemons, depending on the operating system.
A networking service may prepare your internet connection. Security software may begin monitoring the system. Audio services initialize sound functionality. Update systems may check their status. Bluetooth services prepare wireless accessories. Cloud synchronization software may begin connecting to remote servers.
Many of these processes start automatically because the operating system considers them necessary or because installed applications have configured themselves to launch during startup.
This is one reason two computers with similar hardware can have very different boot times. One machine may be loading far more background software than another.
Step 12: The Login Screen Appears
Eventually, the operating system has initialized enough of itself to present the login interface.
Seeing the login screen does not necessarily mean absolutely everything has finished loading. Some background processes may still be starting, network connections may still be forming, and updates or synchronization tasks may still be running.
However, the system has reached the point where it can authenticate a user.
When you enter a password, PIN, fingerprint, or other authentication method, the operating system verifies that you are authorized to access the account.
Once authentication succeeds, another stage begins: loading your personal environment.
Step 13: Your User Profile Is Loaded
A modern computer is not simply loading one generic desktop. It is loading an environment associated with your particular user account.
Your account may have its own wallpaper, application settings, browser information, accessibility preferences, saved network configurations, files, permissions, and other personalized data.
The operating system loads the relevant profile information and prepares your desktop environment.
Applications configured to start automatically may begin launching as well. Cloud storage tools might synchronize files, messaging apps may connect to their servers, and security programs can begin additional scans or monitoring.
This explains why the desktop may appear before the computer feels completely ready. The core operating system has booted, but your personal collection of background applications may still be starting.
Step 14: The Desktop Becomes Usable
Finally, the familiar desktop appears and the computer becomes ready for normal use.
By this point, an enormous amount of work has already happened.
Electrical power has been stabilized. The processor has begun executing instructions. Firmware has initialized hardware. Memory has been tested and prepared. Storage devices have been detected. A bootloader has been located. The operating-system kernel has been loaded into RAM. Drivers have initialized devices. File systems have become accessible. Background services have started. Your identity has been authenticated, and your user environment has been created.
All of this may happen in only a few seconds on a modern computer.
That speed can make the process seem simple, but it is actually a carefully coordinated chain containing many independent systems.
Why SSDs Made Booting So Much Faster
One of the biggest improvements in computer startup speed came from the widespread adoption of solid-state drives.
Traditional hard disk drives store information on spinning magnetic platters. A mechanical read/write head has to physically move to different locations to retrieve data. During startup, when the operating system needs to access many files, these mechanical movements can create delays.
SSDs have no moving read/write head. They use flash memory to access information electronically, allowing many types of data to be retrieved much more quickly.
Because booting requires reading substantial amounts of information from storage, switching from a hard drive to an SSD can dramatically reduce startup time.
A computer that once took a minute or more to become usable may boot in a fraction of that time with faster storage.
Why Some Computers Still Boot Slowly
A fast SSD does not guarantee an instant startup.
The firmware itself may take time to initialize hardware. The operating system may need to load numerous drivers and services. Security software may perform startup checks, and applications may configure themselves to launch automatically when you sign in.
Updates can also affect boot times. Sometimes an operating system needs to finish installing or configuring an update during startup, adding extra steps before the normal desktop becomes available.
Hardware problems can create delays as well. A malfunctioning storage device, incompatible peripheral, memory issue, or driver problem can cause the system to spend additional time trying to initialize components.
Slow startup is therefore not one single problem. It can originate at several different stages of the boot process.
Restarting and Shutting Down Are Not Always Identical
It seems logical that shutting down a computer and turning it back on would be exactly the same as restarting it, but modern operating systems sometimes complicate that assumption.
Some systems use fast-startup or hybrid-shutdown techniques that preserve certain information instead of performing a completely fresh boot every time. This can make ordinary startup faster.
A restart may intentionally perform a more complete reload of the operating system.
This is one reason technical support often specifically asks users to restart a computer rather than simply turning it off and back on. Depending on the operating system and configuration, restarting can clear states that an optimized shutdown may preserve.
The old advice to “restart it” sounds simplistic, but there is a legitimate technical reason it solves many problems.
What Happens During a Restart?
When you restart the computer, the operating system closes applications and services, ends active processes, and prepares the machine to begin the startup sequence again.
The computer then returns through some of the same stages involved in a normal boot. Firmware performs initialization, the bootloader runs, the kernel loads, drivers start, and system services are recreated.
This clears a large amount of temporary system state.
If a program has become stuck, a driver has entered an unusual state, or memory contains problematic temporary information, restarting can eliminate the condition and allow the software to begin again cleanly.
It is essentially a controlled reset of the computer’s active environment.
What Happens If the Boot Process Fails?
Where the computer stops can provide clues about what went wrong.
If absolutely nothing happens when the power button is pressed, the problem may involve power delivery or hardware. If lights and fans activate but no image appears, the failure may be occurring during early hardware initialization.
If the manufacturer’s logo appears but the operating system does not begin loading, the firmware may be unable to find a valid boot device or bootloader.
If the operating-system logo appears and the machine crashes afterward, the problem may involve system files, drivers, updates, or storage.
If the computer reaches the login screen but becomes extremely slow after signing in, startup applications or user-specific software may be responsible.
Understanding the boot sequence therefore provides a useful framework for troubleshooting. Instead of simply saying “the computer won’t start,” you can identify roughly where the startup process stops.
Secure Boot Adds Another Check
Modern computers may also use a security feature called Secure Boot.
Secure Boot helps verify that certain software involved in the early startup process is appropriately trusted before allowing it to run. The goal is to prevent malicious software from inserting itself into the boot process before the operating system and its normal security protections have fully started.
This matters because malware that gains control extremely early in startup can be particularly difficult to detect and remove.
Secure Boot uses cryptographic verification as part of establishing a chain of trust from the computer’s firmware toward the operating system.
It is another example of how modern booting has evolved from simply “load the operating system” into a process that also considers security.
Sleep Is Very Different From Booting
When a computer wakes from sleep, it does not normally perform the entire boot process again.
During sleep, the machine preserves its current working state while reducing power consumption. RAM generally remains powered so the information representing your open programs and current session can remain available.
When you wake the computer, it can return to that existing state instead of rebuilding everything from the beginning.
That is why waking from sleep usually takes only a second or two, while a full boot takes longer.
Hibernation works differently by saving the computer’s active state to storage and powering down more completely. When the machine starts again, it restores that saved state rather than creating an entirely new session.
These techniques make computers feel instantly available even though a genuine cold boot involves considerably more work.
A Few Seconds Hide an Enormous Amount of Work
The remarkable thing about booting is not simply that computers can perform all these steps. It is that modern machines can perform them so quickly and reliably that most people never notice.
You press one button.
Electricity begins flowing through the system. Firmware wakes the hardware and checks that essential components are available. The computer finds a bootable device and launches a bootloader. The operating-system kernel moves into memory and begins controlling the machine. Drivers activate hardware, file systems become accessible, services begin running, security systems initialize, and eventually your personal desktop appears.
Only then do you open your browser and begin using the computer.
What feels like a single action is actually a carefully choreographed handoff from hardware to firmware, from firmware to the bootloader, from the bootloader to the operating system, and finally from the operating system to you.
The next time your laptop goes from a completely powered-off machine to a working desktop in ten seconds, those ten seconds might seem slightly more impressive.